
Wiki Guide: How to Extract Data from Wikipedia Using an API?
![Muninder Adavelli]()

Muninder Adavelli
Updated · Feb 11, 2024
Updated · Jul 26, 2023
Deyan is an avid enthusiast and self-proclaimed fan of the Windows operating system. His passion for... | See full bio
Girlie is an accomplished writer with an interest in technology and literature. With years of experi... | See full bio
This page may contain links to our partners’ products and services, which allows us to keep our website sustainable. Тechjury.net may receive a compensation when you sign up and / or purchase a product or a service using our links. As an Amazon Associate we earn commissions from qualified purchases. This comes at no extra cost to you. On the contrary, these partnerships often allow us to give you discounts and lower prices. However, all opinions expressed on our site are solely ours, and this content is in no way provided or influenced by any of our partners.
Twitch is one of the most popular live streaming video platforms worldwide, with at least two million people tuning in daily to watch streamers play their favorite video games.
If you’re one of them, you might have come across some buffering and lagging issues on the site.
Here’s why that’s happening and 10 ways to fix Twitch lagging and buffering.
Although Twitch, like any site of its size, is not entirely problem-free, when users experience buffering issues and lags, most of the time, the problem is on their end.
Buffering is typically the result of insufficient resources, which can be caused by:
If the issue is not browser- or connection-related, then it might be that Twitch’s own server is down. Usually, when a site that’s as big as Twitch is having serious server issues, they’re quick to announce this to their users.
You can also test this by visiting a similar streaming site and try loading a stream there.
If you’re spending a good amount of time playing games online, you might want to consider joining the Twitch community. Here’s how to start streaming on Twitch.
If Twitch keeps lagging or buffering, the first step to fixing the issue is to identify what’s causing it.
Here are the 10 most common issues that prevent Twitch videos from loading and how to fix them.
If the stream you’re trying to watch on Twitch keeps stuttering, then the issue might be as simple as a bad Internet connection.
You can use SpeedTest by Ookla to check your Internet connection speed. A speed that’s below average can affect Twitch streams.
To fix it, you can try:
If you live in an area where the Internet speed is slower than normal or you have a slow Internet plan, you can try to reduce the quality of the stream you’re watching. You can do this by clicking on the cogwheel icon in the stream.
If your Twitch videos are stuttering, it might be because you haven't cleared your browser's cache and cookies in a while. These can cause your browser to slow down and affect your Twitch viewing experience.
Regardless of the browser you use, the process of clearing the cache is the same.
Since most use Google Chrome, here’s a step-by-step guide on how to clear cache and cookies there:
1. Open Google Chrome and click on the three dots in the top right corner.
2. Hover with your cursor over History and click History (or press Ctrl+H).
3. Select Clear browsing data from the menu on the left side of the screen.
4. Check the boxes next to Cookies and other data and Cached images and files in the pop-up box. You can also delete your browsing history here.

5. At the top of the pop-up box, select All time in the time range box.
6. Click Clear data.
Browser extensions are useful add-ons that can expand the functionality of your browser.
However, too many extensions can also slow down your browser and lead to Twitch lagging and buffering issues.
To disable or remove browser extensions from Google Chrome:
1. Open Google Chrome and click on the three dots in the right corner of the window.
2. Hover with your cursor over More tools and select Extensions from the dropdown menu.
3. In the next window, you will see a list of all the extensions installed on your browser.
4. To disable the extension click the blue toggle switch at the bottom of the box.

5. To delete an extension from your browser, click Remove and then Confirm.
After you disable all extensions, you should check whether if the buffering issue has been resolved.
If Twitch is now running smoothly, you can try turning on each extension one by one to identify the extension that is causing buffering.
Twitch video stuttering can be the result of using hardware acceleration to process data through your GPU.
To disable this feature in Google Chrome:
1. Open Google Chrome and click the three dots in the top right side of the browser.
2. Select Settings from the dropdown menu.
3. In Chrome's settings, click System in the left-side menu.
4. Click the toggle next to the Use hardware acceleration when available option to disable it.
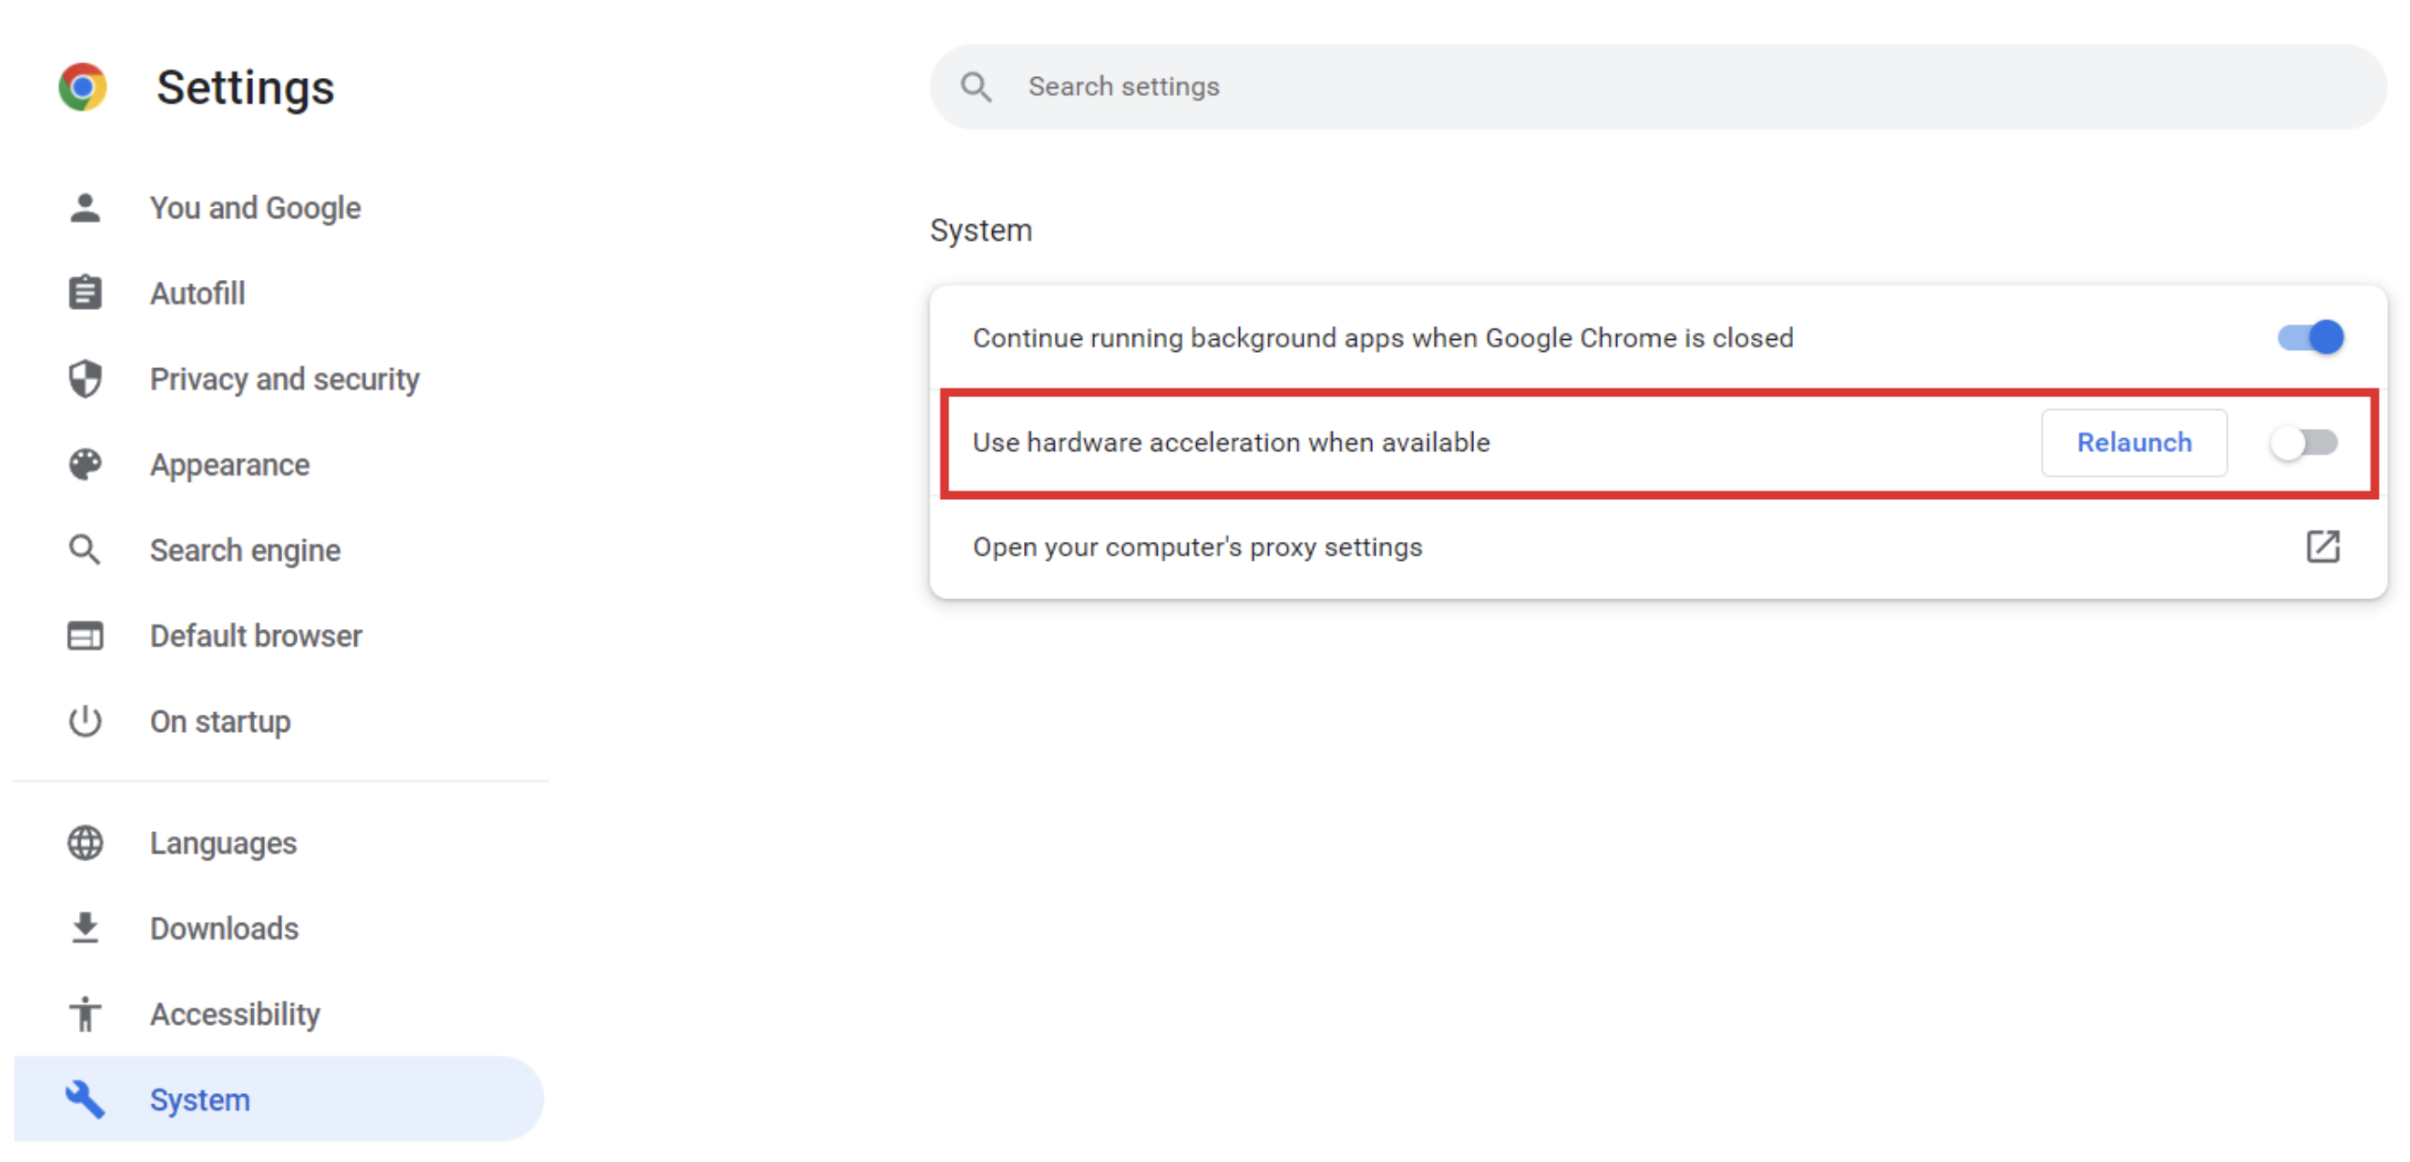
5. Restart your browser for the change to take effect.
Your Twitch might be lagging while watching when using your ISP's default DNS server. Switching to a public DNS server like Google DNS usually helps fix the issue.
To switch to a public DNS server:
1. Click Start on your desktop and select Settings (or use the Windows + I shortcut).
2. Click Network & Internet.
3. From the Status menu area, select Change adapter options.
4. A window with all the available network connections will open. Find your network connection and right-click on it. Then, choose Properties from the menu.
5. Select Internet Protocol Version 4 (TCP/IPv4) from the list of options and click Properties.
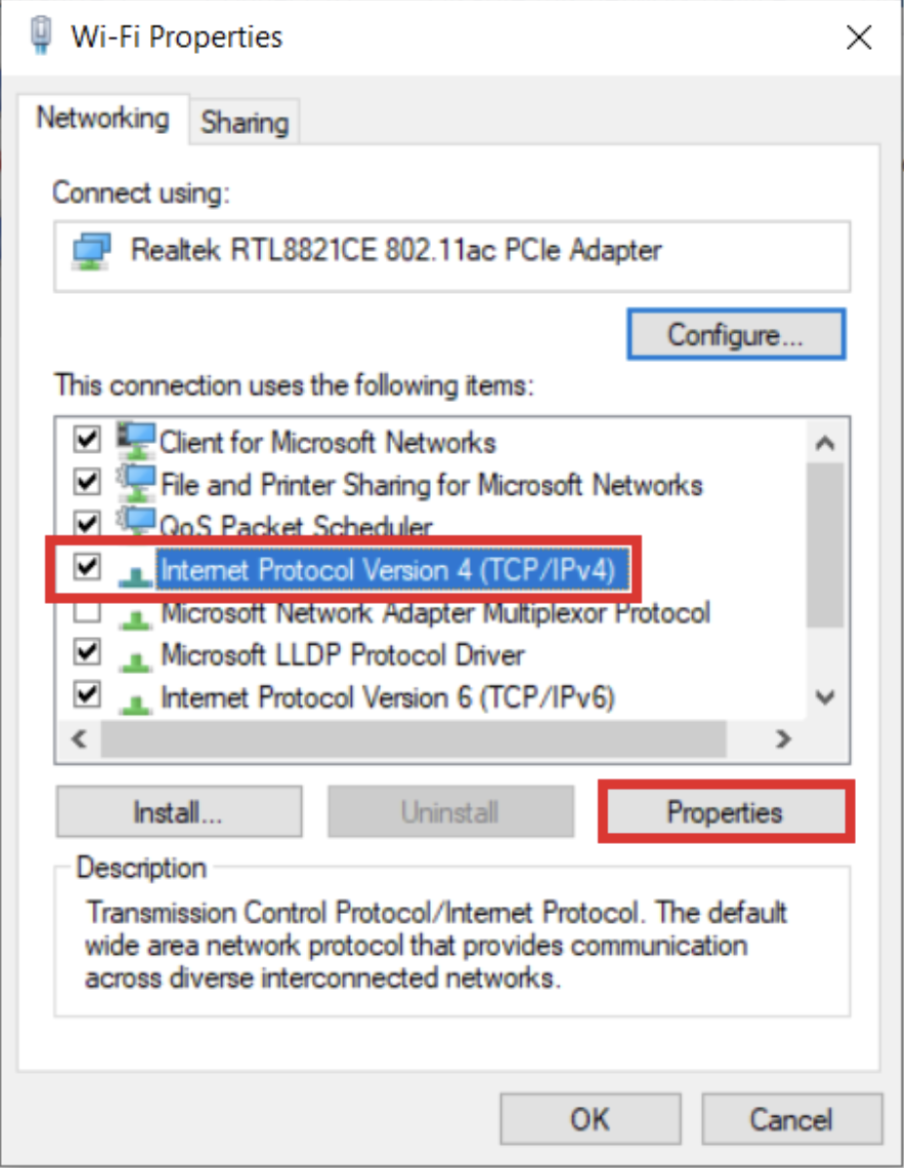
6. In the pop-up window, mark Use the following DNS server addresses.
7. Type in 8.8.8.8 in the Preferred DNS server field and 8.8.4.4 in the Alternate DNS server field.

8. Click OK to save the changes.
Applications that run in the background consume some of your bandwidth even when you aren’t using them, especially those that require frequent updates and download patches from the Internet.
This can easily cause your Twitch streams to start lagging.
To stop apps from running in the background on Windows 10:
1. Open your PC Settings.
2. Click on Privacy.
3. Scroll down and select Background apps from the sidebar on the left.
4. Toggle the switch under the Let apps run in the background option. This will stop any apps from running in the background. You can also pick what apps you want to prevent from running in the background under Choose which apps can run in the background.
A VPN slows down your Internet connection because it sends your traffic to a VPN server, which is an extra step in the process. A proxy works in a similar manner. (We explain the difference between a VPN and a proxy here.)
Although all VPNS affect your connection speed more or less, you’re unlikely to see much of a difference with the VPNs that are good for streaming.If you’re using a free VPN, you might need to turn it off for the stream lagging on Twitch to stop.
If you are connected to a proxy server, here’s how to disable it on Windows 10.
1. Open the Start menu on your Windows PC and select Settings.
2. Click on Network & Internet.
3. Select Proxy from the sidebar menu on the left.
4. Toggle off the Automatically detect settings and Use setup script options under Automatic proxy setup. Then, scroll down and toggle off the Use a proxy server option under Manual proxy settings.

Malware typically uses a lot of resources, which in turn slows down your computer and any online activity.
Depending on what you’re dealing with, this mgiht be a quick Twitch lag fix. One way to confirm whether you’re dealing with malware or not is to install antivirus software.
If the software doesn’t find any malware, it could be that the antivirus itself is the reason behind the lagging (because it’s running in the background).
To check if the antivirus software is the issue, you can disable it and try the stream again. If it is, consider switching to a different antivirus solution. You can find our top-rated antivirus software for 2022 here.)
If you can’t find what’s slowing down your browser– and you know that’s the reason why Twitch is buffering– you should consider changing the browser.
You can try the more popular options, like Mozilla Firefox, Microsoft Edge, and Safari, or Opera GX, a browser made specifically for gamers that comes with Twitch integration, allowing users to access their favorite creators and content on Twitch quickly and easily.
Finally, you can try blocking specific IP ranges through your Windows firewall. Many users have reported that this helped them fix Twitch stream lagging and buffering, so it is worth a try.
To block an IP range:
1. Type in "Windows Defender Firewall with Advanced Security" into the search box on your Windows PC and click on the first result.
2. Click on Inbound Rules in the window panel on the left and select New Rule on the right side, under Actions.
3. Select Custom rule in the pop-up window and click Next.
4. Under ‘Which remote IP addresses does this rule apply to?’, click These IP addresses, and then on Add.
5. In the next pop-up window, select This IP address range. Then type in 206.111.0.0 in the From field and 206.111.255.255 in the To field.
6. Click OK to save the changes.
7. Repeat the same steps to get to the Scope window.
8. This time, enter 173.194.55.1 in the From field and 173.194.55.255 in the To field.
9. Click Next and select Block this connection.
10. Once that’s done, restart your PC to save the changes.
Although many Twitch users seem to stumble upon small issues on the site, these 10 ways to fix Twitch lagging and buffering typically solve most of the problems. If you've tried all of the solutions and none of them seem to work, the problem might be on Twitch's end, in which case you'll just have to wait it out until they fix it themselves.
SHARE:
Your email address will not be published.
Updated · Feb 11, 2024
Updated · Feb 11, 2024
Updated · Feb 08, 2024
Updated · Feb 05, 2024