
Wiki Guide: How to Extract Data from Wikipedia Using an API?
![Muninder Adavelli]()

Muninder Adavelli
Updated · Feb 11, 2024
Updated · Jul 11, 2023
Aditya is an Azure DevOps and Infrastructure Virtualization Architect with experience in automation,... | See full bio
If I was asked to describe myself using just a few words, I’d go with digital marketing expert, ex... | See full bio
This page may contain links to our partners’ products and services, which allows us to keep our website sustainable. Тechjury.net may receive a compensation when you sign up and / or purchase a product or a service using our links. As an Amazon Associate we earn commissions from qualified purchases. This comes at no extra cost to you. On the contrary, these partnerships often allow us to give you discounts and lower prices. However, all opinions expressed on our site are solely ours, and this content is in no way provided or influenced by any of our partners.
Changing your DNS servers can be helpful for various reasons. For example, if you are having trouble connecting to the Internet, changing your DNS servers might fix the problem. This guide will show you how to change your DNS servers on Windows 11. Read on for more!
DNS over HTTPS is easy to configure and improves your privacy and security by encrypting your inbound and outbound DNS traffic. The Settings app is the best option if you’re not keen on typing.
To change your DNS address to Windows 11 with Settings, follow these steps:
Note: If using a Wi-Fi connection, click on Properties to open DNS settings.

Image credit: pureinfotech.com

Image credit: pureinfotech.com
Extra: In the "Preferred DNS encryption" field, opt for the "Encrypted only (DNS over HTTPS)" option to turn on DNS encryption.
Even though some people are not very comfortable using it, the fastest way to change DNS servers on Windows 11 is to go through the Command Prompt.
Follow these steps:
| netsh interface ip set dns name=”Ethernet0” static 1.1.1.1 |
| netsh interface ip add dns name=”Ethernet0” 1.0.0.1 index=2 |
After you finish the steps, run ipconfig /all to check everything.
The NetTCPIP module can be used with PowerShell to manage DNS server settings on Windows 11.
To change the DNS server address using PowerShell, follow the steps below:
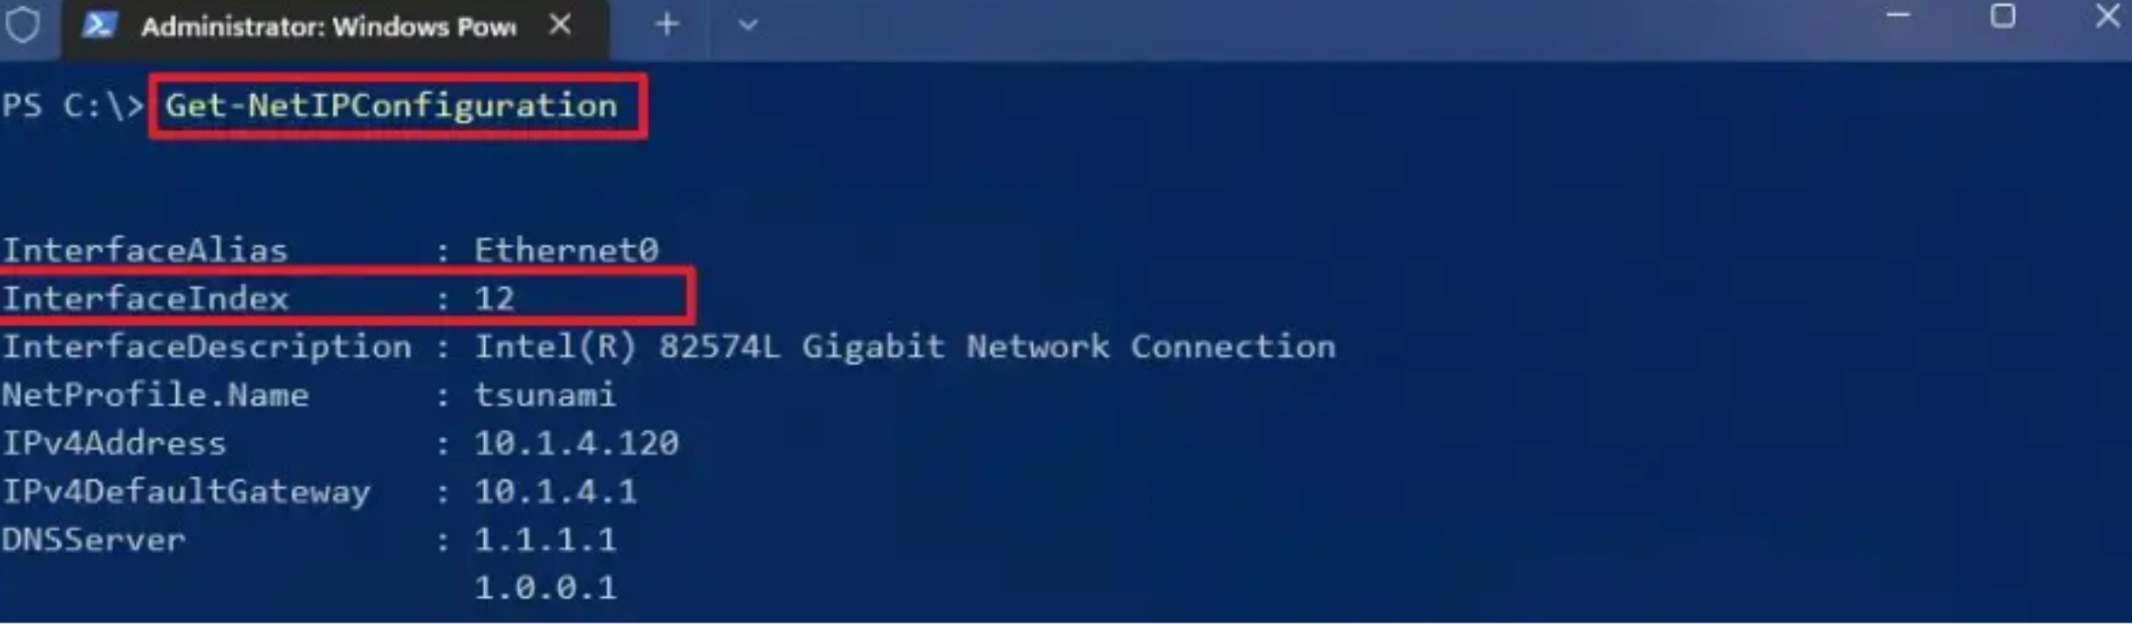
Image credit: pureinfotech.com
| Set-DnsClientServerAddress -InterfaceIndex 12 -ServerAddresses 208.67.222.222 |
To modify your Windows 11 DNS address through Control Panel, follow the steps below:
After you finish these steps, confirm the new configuration by using a service like DNS leak test.
| You can check out our thorough guide if you want to learn more about DNS leaks, what causes them and how to stop them. |
You can use any DNS server you want on Windows 11, but you can't turn on DNS over HTTPS.
The DNS server must be connected to the correct IP address, or you won't have access to the internet.
You might be interested: How to Fix DNS Not Responding Issue on Windows 11
There are many DNS servers, from ISP to other popular ones. If you need a fast and secure solution, there are many companies to choose from, but some of the best ones include Cloudflare, OpenDNS, and Google. Of course, you’re not limited to using these services, but they are a good starting point.
Google Public - Best for transparency
DNS addresses:
Cloudflare - Best for privacy
DNS addresses:
OpenDNS by Cisco - Best for blocking phishing sites
DNS addresses:
DNS servers are a vital part of the Internet, translating domain names into IP addresses so that browsers can load websites. Hopefully, after reading our article, you will know how to change DNS servers on Windows 11 and be able to use the different methods we’ve outlined without any issues.
SHARE:
Your email address will not be published.
Updated · Feb 11, 2024
Updated · Feb 11, 2024
Updated · Feb 08, 2024
Updated · Feb 05, 2024