
Updated · Feb 11, 2024
Updated · Aug 14, 2023
Harsha Kiran is the founder and innovator of Techjury.net. He started it as a personal passion proje... | See full bio
Florence is a dedicated wordsmith on a mission to make technology-related topics easy-to-understand.... | See full bio
With over 422 million victims, you’ll need a proxy to avoid the threats of identity theft and cybercrime.
A proxy is a server you can use for more accessible, secure, and private web browsing. It acts as your representative and connects to the Internet for you.
Web browsers like Google Chrome usually do not include a proxy server by default. You need to turn it on manually or use a Chrome extension to use a proxy.
Smartproxy is a top-rated proxy provider trusted by many. Its 65 million+ proxies from 195+ locations help bypass CAPTCHAs, geo-blocks, and IP bans. It offers a 14-day free trial and has a high rating of 4.7 on Trustpilot with 90% 5-star ratings, making it one of the best in the industry.
Read further to learn how to manually change your proxy settings in Google Chrome or other browsers.
Google Chrome doesn’t have proxy server settings built into it. It will redirect you to your operating system's proxy settings if you want to configure it manually.
Follow the steps below to change your Google Chrome proxy settings for Windows and MacOS:
Here's a guide on manual proxy configuration on Google Chrome if you're a Windows user:
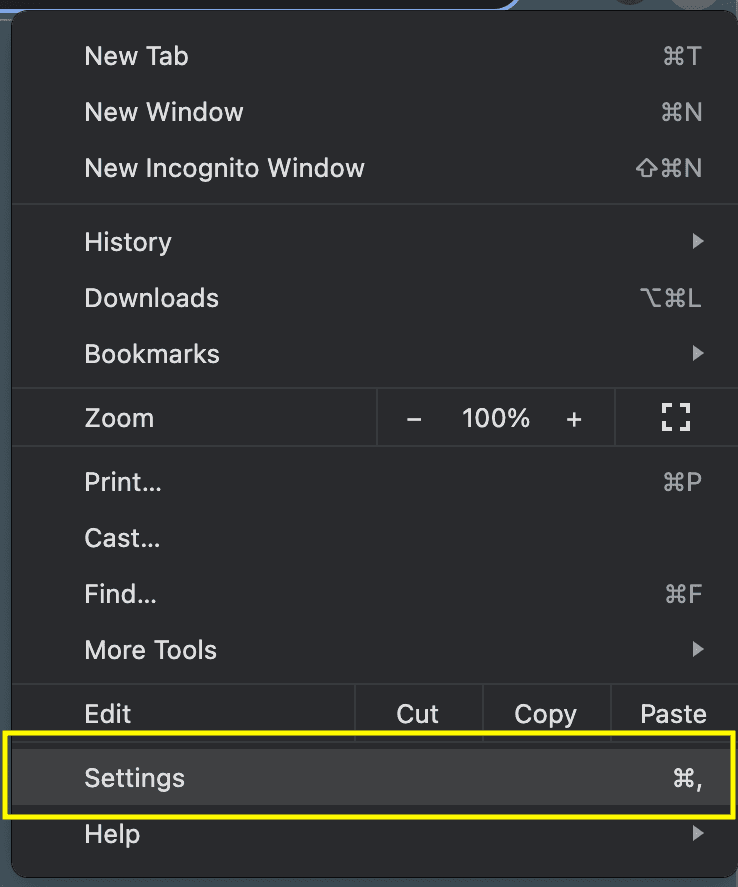
Step 1: In the top-right corner of your browser, click the three-dot icon.

Step 2: Select Settings.
Step 3: Search for 'proxy' in the search bar. Click Open your computer's proxy settings.

Step 4: Turn off the Automatically detect settings.

Step 5: Toggle the Use a proxy server option. Enter the proxy address and port you want to use.

Here's a guide on the manual proxy setup in Google Chrome if you're using MacOS:
Step 1: Click the three-dot icon in your web browser’s top-right corner.
Step 2: Select Settings.

Step 3: On the search bar, type ‘proxy.’ Then, select 'Open your computer's proxy settings.'
Step 4: Toggle web proxy (HTTP) on the Proxies tab.

Step 5: Write down the proxy server address and the port.

If you do not want to handle the manual proxy configuration, then proxy managers can help you.
Proxy managers let you enjoy more secure, private, and accessible web browsing by changing your proxy settings automatically.
They also come in the form of web browser extensions, which makes the configuration process more convenient. These browser extensions allow you to manage proxy servers on Google Chrome.
Below are some of the best proxy manager extensions for Chrome:
Proxy Switchy Auto
ProxySwitchy Auto is a free proxy extension for Google Chrome. This tool automatically switches between proxy settings depending on URL patterns.
Proxy Switcher and Manager
Proxy Switcher and Manager is another free proxy extension. It allows users to switch between different proxy servers. As a result, you can use several IP addresses while browsing.
FoxyProxy
FoxyProxy is a popular browser extension with a feature called GeoShift. This feature lets you switch among 100 countries while browsing. It also features IP addresses from various cities worldwide.
Proxies on Google Chrome come with different advantages and disadvantages.
Below is a table showing the benefits and downsides of using proxies in Google Chrome and browsing in general:
|
Pros |
Cons |
|
Makes you anonymous when you surf the web by masking your IP Address |
Slows your browsing speed |
|
Saves bandwidth by blocking ads, caching pages, and compressing traffic |
Some proxies lack encryption |
|
Protects you from cyberattacks by improving online security |
Manual setup can lead to a broken connection |
|
Prevents trackers used by advertisers and entities |
Some proxies can be pricey |
|
Lets you access geo-restricted content |
Sites may detect proxy use and block access |
A proxy is essential for safer, faster, and more accessible web browsing. Google Chrome does not have built-in proxy settings, so users must manually change it by going to the operating system's settings.
You can also rely on automatic proxy managers if the configuration process seems like a hassle.
Proxy extensions allow users to log in and access proxies within Google Chrome. With an extension, you can use a proxy to surf the web with more privacy when using Google Chrome.
Google’s proxy server address for IPv4 is '8.8.8.8' and '8.8.4.4'. For IPv6, it is '2001:4860:4860::8888' and '2001:4860:4860::8844'.
Look at the native system proxy settings. You can also test the proxy server by contacting your network administrator.
Your email address will not be published.
Updated · Feb 11, 2024
Updated · Feb 11, 2024
Updated · Feb 08, 2024
Updated · Feb 05, 2024


