
Wiki Guide: How to Extract Data from Wikipedia Using an API?
![Muninder Adavelli]()

Muninder Adavelli
Updated · Feb 11, 2024
Updated · Aug 04, 2023
Velina describes herself as passionate media savvy and a versatile individual with numerous differen... | See full bio
Florence is a dedicated wordsmith on a mission to make technology-related topics easy-to-understand.... | See full bio
This page may contain links to our partners’ products and services, which allows us to keep our website sustainable. Тechjury.net may receive a compensation when you sign up and / or purchase a product or a service using our links. As an Amazon Associate we earn commissions from qualified purchases. This comes at no extra cost to you. On the contrary, these partnerships often allow us to give you discounts and lower prices. However, all opinions expressed on our site are solely ours, and this content is in no way provided or influenced by any of our partners.
Three Dimensional Printing, commonly called 3D Printing, can create tangible products from a digital design by printing and fusing small layers of material. This technology enables extraordinary personalization and a major industrial revolution.
Painting is the most effective method for giving your 3D-printed creations a completed, professional appearance. The paint conceals flaws and also serves as a protective coating, making the 3D image more resistant to deterioration from external elements such as UV rays and moisture.
This article will provide steps and tips for creating amazing 3D-printed products. To learn more about 3D Printing, the materials, and the steps involved in painting, you can read the following.
|
Key Takeaways |
||
|
|
Various materials like acrylic, oil-based, spray paint, enamel paints, and lacquer can paint 3D prints after careful preparation and priming. |
|
|
|
To prepare 3D prints for painting, one should secure the necessary materials, remove unwanted parts, and sand the models. |
|
|
|
A primer coat is essential before painting, transforming 3D prints into professional products, ensuring paint adherence, and facilitating a flawless final surface. |
|
|
|
Techniques like airbrushing, spray painting, and hand painting can be used to paint 3D models, followed by finishing touches to enhance the project's aesthetics. |
|
The best way to make your designs look polished and visually appealing is through painting. To begin painting, you don't just start rubbing or spraying it onto the print after 3D printing. You need to follow vital steps before, during, and after painting to achieve professional results
|
🎉 Fun Fact: Unlike 3D printed items that hold a static shape akin to plastic or metal parts, 4D printed objects can morph over time, adding the element of temporal transformation as their fourth dimension. |
Read on for a detailed step-by-step process of how to paint 3D-printed models, along with helpful tips for finishing a quality project.
Choosing a material for 3D printing takes work. It often requires balancing multiple attributes to accomplish the desired result.
Whether you are creating a prototype for a product design, a home decoration, or a functional part, painting is a reliable method to add protection, hide imperfections and enhance the appearance of your 3D prints.
Here are some of the essential materials used in painting 3D prints:
Before preparing your 3D print for painting, let's examine which paints are compatible with thermoplastics such as PLA. PLA is one of the thermoplastic filaments that are simplest to paint. With proper surface preparation and priming, most paint varieties will adhere to the material's surface.
Although many pigments are compatible with PLA, various options are available to you in terms of paint material and application technique.
The following are examples of standard 3D printing paints that you can use.
The most common type of paint used for 3D printing. It is also the most user-friendly and cost-effective type of paint. It adheres well to a variety of surfaces and has excellent coverage.
It can produce prints with vibrant colors and incredibly realistic details. Oil-based pigments do not dissolve in water, requiring chemical cleaning and removal. Oil paints require several days to cure, making them ideal for traditional techniques requiring extensive blending.
Spray paint is the finest option when painting a large 3D print or when only one or two colors are required. Spray painting applies coats swiftly and evenly, so it's ideal for projects that require speed and efficiency. 2-in-1 formulations paint and prime an object simultaneously.
When cured, enamel pigments are among the most resilient. Like Acrylics, they require at least 24 hours to dry, and it is preferable to allow them to dry for longer to achieve optimal strength or durability.
Lacquer is typically a clear topcoat applied over a painted model to seal and protect the paint and create a hard, durable layer. Usually, it can have either a glossy or matte finish.
Now that you know what kinds of paints work best with 3D printing, we'll go into detail about the primers you should use.
Priming is an essential process before painting 3D prints. It provides a uniform exterior for the paint to adhere to. Choosing a primer and color from the same brand will produce the best results for your model.
Here are some recommended primers that you can select to transform your print into a dazzling, display-ready product.
Vallejo Surface Primer - All-purpose brush-on or airbrush primer.
Rust-Oleum Primer and Filler - Great for larger models, fill, and smooths build lines.
Testors Enamel Primer - Recommended aerosol spray primer.
|
💡Did You Know? You can create a lot of fun things with a 3D printer like computer models, prototypes, and even toys! |
Aside from the paint and primers, here are some materials for 3D printing.
Before applying primers, you must know which material suits your 3D Print model. Here’s what you need to know about this step.
You must first remove any supports to prepare the 3D-printed model for the painting. Eliminating lumps and ensuring a clean print is essential to ensure your 3D print is structurally and aesthetically correct. You can either use your bare hands or the following tools to remove unwanted parts:
 |

After removing unwanted parts, the next part is polishing or sanding the model’s surface. Continue reading the next section to learn more about the sanding process.
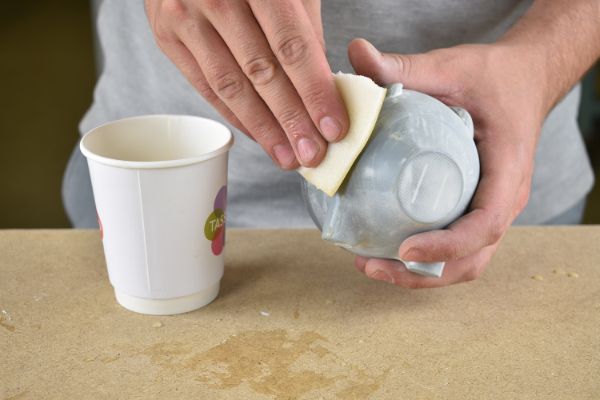
Sanding your 3D-printed objects is the simplest method for creating attractive surface treatments. This method requires patience to achieve the finest results.
Two options for polishing your 3D print are available: hand and electric sanding. Each option has advantages, so let's examine them both.
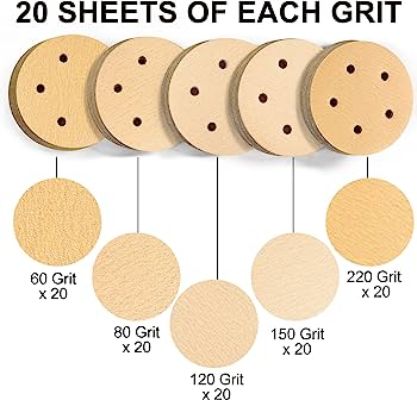
Hand sanding is a time-consuming but effective method to finish and enhance the appearance of your 3D prints. You can find sandpaper in supply stores, online, and even in your old toolbox, but you need sandpaper with varying grits for the best results.

Circular motions with the sandpaper or sanding block can prevent blemishes and an uneven finish. When sanding 3D-printed plastics, apply minimal pressure; the abrasive should do all the work.
You can choose from various power tools to sand your 3D prints quickly and effectively. Some of these power tools include.
Much like hand sanding, you should start with medium-grit sandpaper and slowly work towards ultra-fine grits when using a power sander. You must take extra care to avoid heat build-up as you work, as power sanders move faster than your hands and generate more friction.
After learning how to sand, you may prime your 3D-printed model using the following instructions.
Priming transforms your 3D print into a professional product and makes the painting process effortless by generating a flawless final surface. Using the following steps, find out how to properly apply a primer to your 3D prints.
1. Mount the part of the model: Drill a pilot hole in an inconspicuous location, place the component on a slender dowel, and then insert the dowel into the paint block.
2. Wash the model's surfaces to remove dust: Use a brush and water to wash away any dust. You may prefer to use deionized or distilled water to thoroughly clean the surface without leaving any spots.
3. Wipe down the model's surfaces with a tack cloth: While wearing nitrile gloves, gently run the tack cloth over the model's surface using long, gentle strokes.
4. Mix the primer: Gently swirl the spray primer for 2 to 3 minutes in a circular motion. Avoid shaking, as this can mix the propellant into the solvent, resulting in bubbles in the coat when sprayed.
5. Spray the first coat of primer to the model: Spray in short, rapid strokes, 6-8” from the part. Start each stroke before the region and end the stroke after the part.

6. Inspect the first coat: With the primer on, inspect for areas needing additional sanding or filing. If sanding is necessary, repeat steps 5-6 to clean off dust before respraying.
7. Spray the final coat of primer: Add a second coat of paint using quick, light strokes until it becomes opaque.

When making 3D prints, choosing a painting technique is essential. This opens up more possibilities for modification and refinement of the model. If you're still wondering what technique to use, you can choose from the options below.
|
✅ Pro Tip: Painting 3D prints can be a delicate and time-consuming process, especially if you're aiming for a high level of detail. Be patient and give each layer of paint enough time to dry before moving on to the next. |
Realistic 3D printing relies heavily on the painting process. The result is an increase in originality. Hand-painting and Spray painting 3D Print are both prevalent techniques for decorating 3D prints.
There are three different techniques used in painting 3D Printed Models, including:
Now that you've decided which technique to use, you can paint your 3D prints through these steps.
The success or failure of a work of art largely influenced the artist's painting technique. It is possible to have a more modern look and increase the range of your resources by combining your paint and painting techniques.
Read on to learn more about these techniques and the procedures involved in implementing them.
The airbrush technique has become very popular among hobbyists and 3D printing enthusiasts because of its capability to apply finer coats of paint on 3D-printed models. This technique also allows producing various effects, like opaque, stains.

Painting 3D prints using an airbrush technique might sound challenging, but it is not impossible. It takes a little effort and some imagination to finish the object.
To efficiently apply paint on your 3d prints on your model, here are steps you can follow:
Hand painting is usually the best choice for 3D prints that require fine details, such as toys or miniature models. You can use good-quality brushes and paint to coat your 3D print in your chosen colors.
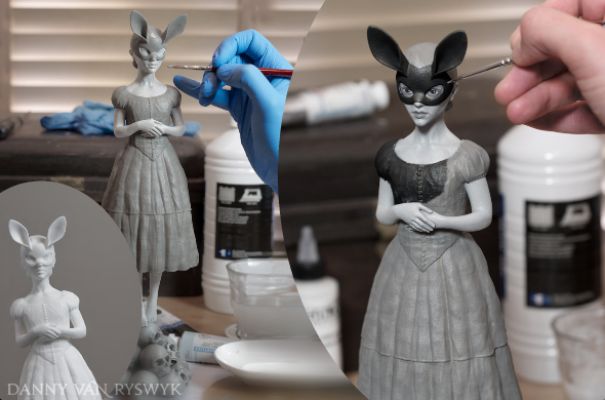
Be creative and ensure that the paint is diluted. Additionally, apply a layer and allow it to cure before proceeding. Here are some 3D Printing tips:
Overall, painting 3D prints with any form of paint should be enjoyable. After sanding and priming the project, you can accomplish a beautiful result through the next step.
A light matte or gloss sealer coat is a great way to finish your project. It's the surest way to keep your artwork looking fresh for decades. Don't be afraid to try new things and use your imagination.
A spray of silver or gold can be used to make glittering effects. You may also apply an antique finish if you prefer a more old appearance. To further customize your painted 3D prints, add details like shadows and highlights or aged and rushed effects.
If you're seeking advice on how to paint 3D printing, consider the following:
Painting 3D prints is a fantastic way to add a personal touch to your designs and exceptional creativity and artistry to your 3D printed models. It is easy but requires much time and planning to ensure the finest results.
Remember that much depends on how you smooth and lubricate your model beforehand. You have acquired the skills to paint 3D prints using acrylics and airbrushing. Now that you've mastered your skills, you can construct your 3D Print.
Spray painting on primer is the most efficient method to paint your 3D-printed components because it evenly coats the surface quickly.
Yes, you can, but there are a lot of disadvantages. Painting without a primer can delay the drying time of the paint and reduce its durability. It will also easily peel or flake without it.
Generally, acrylic paint is the most versatile and easy to use, as it can adhere to most 3D printing materials, dries fast, and can be mixed and diluted with water.
SHARE:
Your email address will not be published.
Updated · Feb 11, 2024
Updated · Feb 11, 2024
Updated · Feb 08, 2024
Updated · Feb 05, 2024