
Updated · Feb 11, 2024
Updated · Jul 27, 2023
Deyan is an avid enthusiast and self-proclaimed fan of the Windows operating system. His passion for... | See full bio
One of the main reasons your PC may be crashing, especially while gaming, is running outdated or faulty graphics drivers.
How to reset your GPU, then? You can first try restarting your drivers, which takes up to 5 seconds, before testing more involved methods like reinstalling your GPU drivers, adjusting your overclock settings, or restoring your default GPU settings.
Below, we go over all these approaches in detail.
If your screen suddenly goes black, but your machine is still running, you can try out a quick-to-use keyboard combo that restarts your GPU drivers.
Simply press the following shortcut: Windows key + Ctrl + Shift + B.
The primary purpose of this key-combo is to save a part of the DispDiag log file that contains all the recent errors related to your GPU and upload them through the Windows telemetry service so Microsoft can diagnose the black screen issue.
However, pressing the above keys will also produce a very useful side-effect: your screen will go blank, and your GPU drivers will reset within a few seconds.
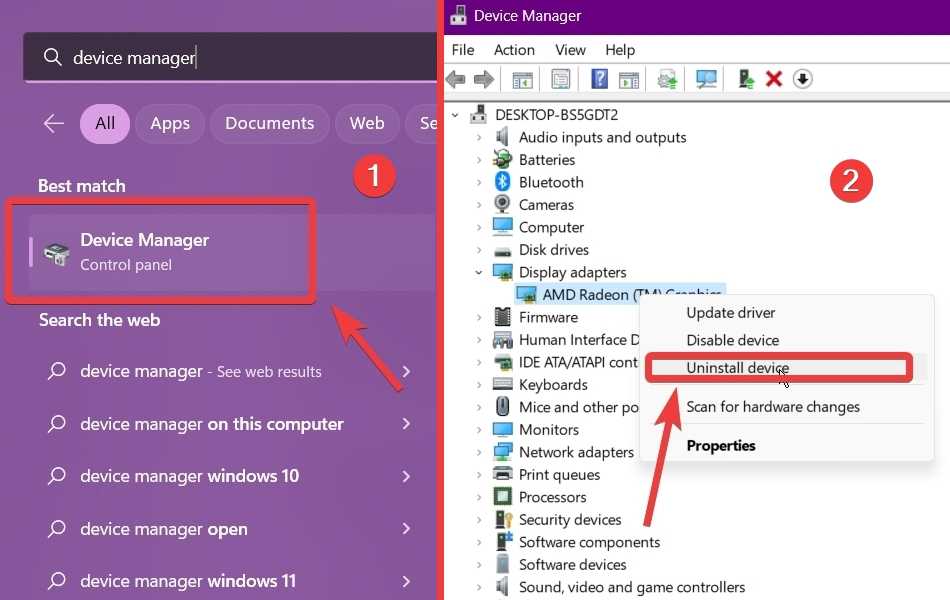
If the above method fails to resolve your graphical issues, the next step involves reinstalling your drivers and even updating them if a newer version exists:

After completing the above steps, restart your PC, and Windows will automatically download and reinstall the latest drivers for your graphics card.
However, the better option is to find the newest drivers for your specific GPU via NVIDIA’s, AMD’s, or Intel’s website and download and install them manually.
Most GPU manufacturers also develop separate control panel apps to set up and monitor your graphics cards, which may also be responsible for your issues if you inadvertently toggle certain options that affect how your GPU behaves and performs.
To fix any potential problems caused by these programs, you only have to reset their settings to default, which does not affect your system or GPU in any way.
For instance, doing so via the NVIDIA Control Panel (NVCP) for your NVIDIA card is rather straightforward: open the NVCP, click on ‘Manage 3D settings’, and tap on ‘Restore Defaults’ in the upper-right corner, after which your settings will revert to normal.

source: NVIDIA Control Panel desktop app
However, AMD users also follow a relatively quick and straightforward procedure. They only have to open their respective control panel—AMD Radeon Settings—then navigate to ‘Preferences’ and toggle the ‘Factory Settings Default’ option.
In some instances, an overclocked GPU may cause all the freezes, stuttering, tearing, and/or black screens you experience. Thankfully, you can easily undo your overclocked settings and restore your graphics card to its stock setup:
Note: To avoid any issues related to overclocking, follow a thorough GPU overclocking guide that takes you through the process step by step.
If you cannot navigate or see your screen due to graphical glitches, you first have to boot your PC in safe mode. To do so, follow these simple steps:
Note: Safe mode is also helpful for troubleshooting and fixing other problems, such as restoring your ‘Windows’ button functionality and getting rid of pesky viruses.
If you have done something wrong and are worried you may have damaged your GPU, several symptoms may confirm your suspicions:
If you’re facing any of these problems, you should stop using your system until you find a solution for your GPU issues, have it serviced, or replace it. Otherwise, you may start seeing bigger problems that may affect your other components.
Since your GPU is an expensive and essential system component, you should always be on the lookout for any symptoms that may indicate something is wrong. Thankfully, in most cases, you only need to spend a few seconds to reset its drivers. But under other, more serious circumstances, you may even require the assistance of certified technicians.
Restoring an NVIDIA GPU to default settings can be done via its Control Panel that you access after right-clicking on the desktop; then, you just have to select ‘Manage 3D settings’ and click on ‘Restore Defaults’ in the upper-right corner of the window.
Definitely, restarting your GPU driver, restoring the default GPU settings, and reinstalling your drivers are all safe methods of reverting your card to normal operation.
Restarting your graphics drivers is fairly easy: press the ‘Windows key + Ctrl + Shift + B’ combo, after which your screen will flicker on and off to complete the process.
Your email address will not be published.
Updated · Feb 11, 2024
Updated · Feb 11, 2024
Updated · Feb 08, 2024
Updated · Feb 05, 2024


