


 Image source:
Wiki Guide: How to Extract Data from Wikipedia Using an API?
![Muninder Adavelli]()

Muninder Adavelli
Updated · Feb 11, 2024
Updated · Aug 15, 2023
Velina describes herself as passionate media savvy and a versatile individual with numerous differen... | See full bio
This page may contain links to our partners’ products and services, which allows us to keep our website sustainable. Тechjury.net may receive a compensation when you sign up and / or purchase a product or a service using our links. As an Amazon Associate we earn commissions from qualified purchases. This comes at no extra cost to you. On the contrary, these partnerships often allow us to give you discounts and lower prices. However, all opinions expressed on our site are solely ours, and this content is in no way provided or influenced by any of our partners.
Screenshots are digital images or snapshots of the current display on a computer or mobile device. It provides a visual way to communicate and document information. It allows you to share precise details, highlight specific elements, and concisely offer context.
Learning when and how to take screenshots is becoming increasingly important. With so many people communicating online and working from home, screenshots have become integral to sharing information.
This article explains several different ways to take screenshots on a Dell laptop. Scroll down below to start!
|
🔑 Key Takeaways
|
There are a few methods to take a screenshot on a Dell laptop. You can easily capture and share screenshots using the following:
Here are the best screenshot-taking options available on a Dell laptop:
Most computer keyboards include a print screen button. They are usually next to the function keys on the first row of the keyboard. The key's label is usually Prt Scr, but it could also be one of the following:
|
📝 Note: Some Dell laptops may require another key paired with the Print Screen key. For example, taking screenshots on the Dell Latitude E 6310 requires pressing Fn + Windows + PrntSC. Moreover, the keyboard shortcut to capture a screenshot varies depending on the Windows version and the type of screenshot. |
|
|
Here are two ways to use the print screen button to screenshot your screen:
 Image from BOB FM
These are the steps to taking a screenshot quickly using the PrtSc key:
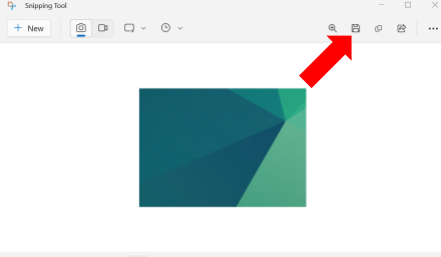
You have successfully captured a snapshot of your screen. Feel free to edit, resize, crop, and save parts of that image to your liking.
You can save your screenshot as a PNG file by pressing Windows Key + Print Screen. The command will capture and save your screen in your screenshot folder and clipboard.
Here are the steps to do this:
Image source: Dell
|
|
✅ Pro Tip: To screenshot only the current window on your screen, press the Alt + Prt Sc keys together. The screenshot is in your clipboard, which you can paste into another program to save or edit. |
If you have searched your keyboard and can not find the print screen key, your Dell laptop may not have one. But don’t worry; you can still take a screenshot even if you do not have that key.
Here are the steps on how to screenshot on a Dell laptop without a Print Screen button:
|
|
📝 In a nutshell: There are 3 ways you can use the Print Screen key on your Dell laptop. You can use the generic Prt Sc and Windows + Prt Sc keys. For keyboards with no Prt Sc key, you can combine the Fn key or Fn key + Windows key + Space bar. |
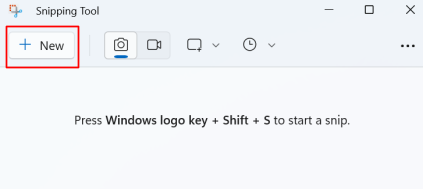
The Snipping Tool was added to Windows 7 and is available in Windows 8, Windows 10, and Windows 11. It is a built-in screenshot tool that allows you to customize the screenshot area.
Here are the detailed steps to take screenshots using Window's built-in snipping tool:
|
📝 Note: If you want to know how to screenshot a specific area of a Dell laptop, use the rectangular snip or freeform snip. It lets you click and drag your mouse over a specific area of interest, then release it. |
Press the Windows key + Shift Key + S key to take a quick screenshot using the snipping tool.
|
|
👍 Helpful Article: Techjury has an article related to taking screenshots on Windows. Read our article on How to Take Screenshots on Windows-8 Proven Ways |
With Game Bar's features, you can take screenshots on your Dell laptop even when you are not playing a game. Microsoft has included the built-in Xbox Game Bar on Windows, allowing screenshots and video recording.
Here are the steps to use it:
|
Hotkeys to Remember |
|
|
Hot Keys |
Function |
|
PrtSc |
Copies full screen to clipboard. |
|
Fn + Insert or Fn + Windows key + Space bar |
To screenshot when the keyboard has no print screen. |
|
Alt + PrtSc |
Copy the snap of your active window to the clipboard. |
|
Windows + PrtSc |
Takes a screenshot and saves it in the dedicated folder. |
|
Windows + Shift + S |
A quick way to open the Snipping Tool window. |
|
Windows + G |
Opens the Xbox Game Bar. |
|
Windows + Alt + PrtSc |
Prompts the Xbox Game Bar to take a full-screen screenshot. |
Using a reliable third-party tool is another way to capture the screen on your Dell laptop. Third-party apps have a lot of extra features, like the ability to add annotations, type text, crop, take videos, share photos, and much more.
One of the top apps for taking screenshots is Lightshot. This free screenshot tool allows you to take shareable, customizable screenshots quickly. Here are the steps to use Lightshot:
|
📝 Note: Lightshot is a free tool you can download and add as a browser extension for top internet browsers like Chrome or Mozilla Firefox. |
Before you can use Lightshot, you need to install it on your
system. Here’s a quick guide:
|
✅ Pro Tip: Lightshot replaces the Print Screen key when installed on a Windows laptop. You can also customize certain key combinations to take screenshots using Lightshot. |
To begin taking screenshots with Lightshot, do the following steps:
All screenshots will be saved as JPEGs on your computer. You can copy and paste them into other programs, like Microsoft Paint. Alternatively, uploading an image to the cloud generates a link that opens the image on a new webpage.
Check out these Lightshot hotkeys to make your screenshot experience better with Lightshot:
|
Hot Keys |
Function |
|
PrtSc |
Start shooting, the desktop version replaces the standard Windows tool for screenshots. |
|
Ctrl + C |
Copy to clipboard |
|
Ctrl + S |
Save a file |
|
Ctrl + E |
Edit certain areas online. |
|
Esc or Ctrl + X |
Close without shooting. It will abort the initiated shooting process. |
|
Ctrl + A |
Expand the selection area to full screen. |
|
Ctrl + D |
Upload a screenshot. After uploading, a small pop-up with the progress and a link will appear. |
Aside from Lightshot, there are several other screenshot apps that you can use to capture your screen. There are paid ones and free ones.
Here are five other apps you can look into:

Image source: PC Mag
Snagit is the most feature-rich app for Windows. It is simple to use and lets you capture screenshots in seconds, with additional editing features for manipulating output files.
Users can try for a free trial, yet pricing for a one-time purchase starts at $62.99 per 1-4 users.
 Image source: Steemit
Greenshot is an open-source app that captures screenshots in various ways. It allows you to quickly capture screenshots that you can easily edit, add notes to, and hide parts of.

It includes a powerful capture tool, an image editor, a color picker, and many other features. PicPick provides tools for quickly capturing screenshots and editing them for various purposes.
PicPick is free to use for regular users. However, businesses must purchase the app for a Single Plan of $30 for 2 users or a Team Plan of $120 for 5 users.
 Image source: GetSharex
ShareX, a free and open-source program, lets you screenshot and share any part of your screen with a single key press. It also allows you to upload images to a variety of supported destinations.
Cropping and resizing screenshots are everyday tasks for editing and organizing visual content. Here are some tips to help you efficiently edit and organize screenshots:
Before you edit a screenshot, consider its purpose. Knowing what you need to capture will help you make cropping decisions.
Optimize compression settings for resizing and saving screenshots to maintain image quality and balance file size.
Annotate screenshots using tools or image editing software to highlight specific areas, using boxes, arrows, or lines for guidance.
Before taking a screenshot, prepare the screen, check for extraneous elements, browser bars, irrelevant toolbars, and cluttered backgrounds.
Resize images for optimal display on websites, social media, and presentations for optimal user experience.
Shortcuts to speed up the screenshot process and editing while removing elements from the screen.
Select a suitable format for saving screenshots through workload and intended use to avoid redoing them.
Utilize batch processing for large screenshots to expedite the editing process.
Implement a systematic approach to organizing screenshots using descriptive folder names and consistent naming conventions.
Regularly review and archive screenshots to maintain a streamlined, organized file of relevant images.
Create a visual index for frequently used screenshots, providing a quick reference for your entire collection.
Taking screenshots on a Dell laptop can be done in many ways. The easiest way to do it is to look for "Print Screen" on your keyboard. Also, Windows has a built-in snipping tool that lets you take screenshots of any part of your screen.
If you want more features, there are free tools that can help you take screenshots. Lightshot is an excellent third-party tool that lets you take screenshots with extra features.
Screenshots themselves are not inherently a security risk. However, the screenshot's content and how it is used or shared can pose a security risk.
It could be a problem with your browser, such as taking a screenshot, which is not a feature of incognito browsers like Chrome and Mozilla. Some apps may also disable the feature to take screenshots.
SHARE:
Your email address will not be published.
Updated · Feb 11, 2024
Updated · Feb 11, 2024
Updated · Feb 08, 2024
Updated · Feb 05, 2024


