
Wiki Guide: How to Extract Data from Wikipedia Using an API?
![Muninder Adavelli]()

Muninder Adavelli
Updated · Feb 11, 2024
Updated · Aug 09, 2023
Velina describes herself as passionate media savvy and a versatile individual with numerous differen... | See full bio
Lorie is an English Language and Literature graduate passionate about writing, research, and learnin... | See full bio
This page may contain links to our partners’ products and services, which allows us to keep our website sustainable. Тechjury.net may receive a compensation when you sign up and / or purchase a product or a service using our links. As an Amazon Associate we earn commissions from qualified purchases. This comes at no extra cost to you. On the contrary, these partnerships often allow us to give you discounts and lower prices. However, all opinions expressed on our site are solely ours, and this content is in no way provided or influenced by any of our partners.
MacBooks dominate the personal computer market, with over 100 million users in 2023. However, it can be challenging when you're working on multiple apps. The split view functionality was designed to solve this problem.
The Split View feature or split screen makes tasks more manageable. It allows you to display two windows side-by-side in full-screen mode. This function increases productivity by eradicating the need to switch between windows frequently.
Learn how to split screen on Mac, including accessing it and making the most of this beneficial tool.
Key Takeaways
 |
MacOS devices offer easy split-screen options to increase users' productivity when using apps. |
|
Different versions of MacOS have various ways to utilize the split screen. |
|
Split screens may not work on Macs that aren’t updated, have disabled display spaces, or need restarting. |
|
If split screens don’t work on your Mac, you can use third-party apps from the Mac App Store. |
On a Mac, you can use split-screen mode to see and work in two windows or applications simultaneously. Users can take in a wide range of data without switching between screens.
Split-screen multitasking is an excellent and convenient way to divide up tasks without having to switch between apps or utilize a large number of trackpad motions.
This feature allows you to have the following:
1. Productivity: If you constantly switch between applications, using a split screen on a MacBook can increase your productivity. This is because you don't pause your work to open another window.
2. Quick response: Split screens are better for anyone working in customer service or requiring a way to respond quickly to work emails. You can use one screen to communicate with colleagues and clients and the other to work.
3. Inexpensive: Using a split screen on a single monitor can save you the cost of setting up multiple monitors. Splitting a screen is simple and becomes easier with practice.
4. Multitasking: A split screen is an excellent option if the main setup in your office uses multiple monitors, but you are working elsewhere. This allows you to enjoy the same multitasking.
Follow the detailed steps below to get the most out of your split-screen configuration.
You can utilize the split-screen feature to check out two or more programs at once on a Mac. Here are the steps you need to follow if you're using an earlier macOS, version like Catalina or earlier:
1. Locate the green, yellow, and red circles. Look in the top-left corner of your program's window to find a series of three colored dots.
2. Hold your cursor over the green circle until a list of options appears.
3. Select left or right. Choose "Tile Window to Left of Screen" or "Tile Window to Right of Screen.”

4. Feel free to adjust the windows to your liking.
You can use the following for older versions of MacOS.
The steps required to enter Split View on a computer running macOS Mojave, Sierra, High Sierra, or El Capitan are slightly different.
Here's how to do it:
1. Left-click, then hold the green button at the top left corner of the window.
2. The app's window will shrink slightly, and the area underneath will turn blue.
3. Leave the app where it sits, or drag it to the other side.

4. Select the second one from the other half of the screen, and you’re ready.
Now that you know how to use a split screen on your Mac, you can significantly reduce the time you spend switching between different applications.
If you want to adjust the screens, follow these steps to help you navigate.
Split View is one function that has yet to reach its maximum potential due to a lack of customization options. You can follow these steps to adjust the size or rearrange the windows:
1. Drag the border left or right to adjust the spacing between the windows.

 |
Pro Tip: If you want to rearrange the windows: Click and drag the window on whichever side you want it. |
The Menu Bar disappears as usual because this functionality allows the Mac to have two side-by-side windows on a whole screen.
If you're using macOS Monterey, you can control whether or not this feature is active. Here's the correct method:
1. Go to System Preferences
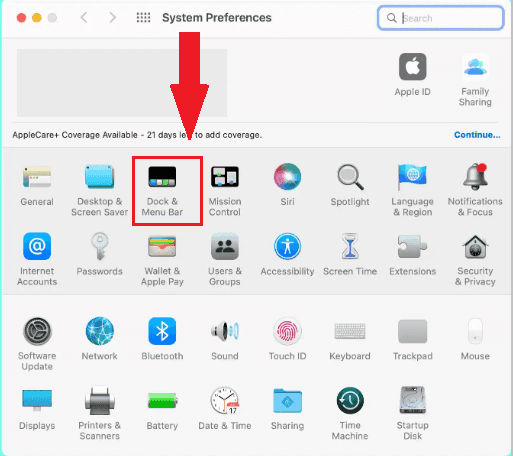
2. Go to Dock & Menu bar
3. Deselect Automatically conceal and show the menu bar on fuel in the primary window of this menu.
Here's how to close the split-screen mode if you're done using it.
When you are through working in the split-screen view, you can close the window and go back to the full-screen mode.
The procedure follows:
1. Move the cursor to the top of the window you want to minimize until the green button reappears.
2. Click the green button to reduce the size of your window. This will exit you out of the split screen.
3. The window you're in will revert to its pre-split screen shape. The other window will go into fullscreen mode
 |
Pro Tip: You may also use Mission Control to return to the desktop after leaving split-screen mode or swipe left or right on the trackpad. |
Here are common problems you might encounter when using a split screen and how to fix them.
A Split view is helpful, but it has some limitations. Here are the most typical problems you can encounter:
If you cannot use Split View on your Mac, the problem can be fixed by following the steps below.
Turning on "Displays have separate Spaces" in the Mission Control panel allows each monitor to have its own set of Spaces.
Here’s how:

Restart your Mac to resolve minor glitches that may prevent AirDrop, Bluetooth, Wi-Fi, and Split View.
To restart your Mac, click on the Apple logo in the top left corner and click “Restart”.

When a new software update launches, update your Mac. These updates contain vital data that helps your Mac’s overall OS’ function, improving aspects such as the split screen feature.
Go to System Preferences or Settings and Click General to update your Mac. Look for Software Update and click on Update or Upgrade Now.
Your Mac will then download the update and notify you when it’s ready to install. You can also turn on Automatic Updates to let your Mac download available updates.

If the split-screen feature doesn't work after following the steps, consider using a third-party app to split screen on Mac. Acquiring a third-party split-screen application is the optimal solution.
The following are split-screen applications currently available for MacOS.
1. Moom

It simplifies the management of Windows while working on a Mac. One of the app's most notable features is controlling screen mode with a keyboard shortcut.
With Moom, you can construct various layouts using the application's in-built palette designer. Additionally, you can create a structure by manually resizing any window.
Moom is available to download for only $.9.99 on the Apple App Store.
2. Divvy

You can access the intelligently designed window grid creator tool by selecting the "Options" key on your Mac. You can manually enter and depart a split-screen view using keyboard shortcuts to create grids more efficiently.
With Divvy, you do not need to resize each window manually but can instead select the optimal layout. It also enables you to add space between windows to improve visibility.
Divvy is available to download for $13.99.
3. Magnet

Allows you to resize your screen to accommodate additional windows. Magnet provides several resizing layouts, but you can also construct your own.
Magnet is similarly priced to Moom at $9.99.
4. BetterSnap Tool

It is an easy-to-use and convenient Windows management application. This tool allows you to construct specific layouts and populate windows with applications for improved workflow management.
BetterSnap Tool is fully customizable with keyboard shortcuts for functions, offering the lowest price for multiple preset window split among four options.
The table below summarizes the features and prices of these alternatives.
|
Features |
Moom |
Divvy |
Magnet |
BetterSnap |
|
Preset Layout |
5 preset layout |
Custom layout |
Multiple Preset |
Multiple Preset |
|
Keyboard Shortcuts |
Available |
Available |
Available |
Available |
|
Price |
$9.99 |
$13.99 |
$9.99 |
$2.99 |
Apple’s MacOS devices are made to withstand multiple open apps and programs. With this, app developers found ways to increase productivity through split screens, boosting productivity.
Split screens help users access apps and Windows easily - without the hassle of switching from one app to another. As opposed to buying several displays, this solution is more cost-effective.
MacOS users also have the option to use Mac’s split screen or use third-party apps to speed the process or provide more window options. Free resources provide temporary options but purchased resources or upgrades will always provide more value.
Split View allows you to use your Mac's entire display for two applications simultaneously without resizing and repositioning windows.
Some applications that do not support split-screen mode are Facebook Messenger, LINE, and Google Duo. Enable developer settings on the device, if not already enabled, or access macOS settings to induce split-screen mode.
Yes, you can. Choose the app and two windows; the same app should open in split-screen mode.
SHARE:
Your email address will not be published.
Updated · Feb 11, 2024
Updated · Feb 11, 2024
Updated · Feb 08, 2024
Updated · Feb 05, 2024