
Updated · Feb 11, 2024
Updated · Jul 28, 2023
Rmoj Amon is a professional copywriter with a special love for technology and curiosity about Window... | See full bio
Lorie is an English Language and Literature graduate passionate about writing, research, and learnin... | See full bio
If you plan to upgrade your computer memory but don’t know what slots to put RAM in — you’ve come to the right place.
It might sound complicated, but finding the correct slot isn’t too tricky.
We’ve composed a comprehensive guide on working out the right slots for your computer and installing them on a desktop and laptop.
Let’s find out.
Yes, RAM slot order matters because of the multi-channel architecture. If you have more than one memory stick, you will need to make them work jointly (dual-channel, triple-channel, etc.), enabling the CPU to access the RAM modules faster. By placing the sticks in the right slots, your computer will optimize its performance.
For that purpose, you’ll need to make sure that the RAM modules are placed in the correct slots. To take advantage of the dual-channel support, you have to know which RAM slots to use. They are usually configured in pairs. For instance, in a motherboard with four RAM slots, you’ll have to use the second and the fourth slot for two sticks, and only after that, if you get a second pair, you should put it into the first and third slots.
So, what's the difference between RAM slots 1-3 vs. 2-4?
A1 (slot 1) and B1 (slot 3) are typically reserved for a single channel of the same type, and A2 (slot 2) and B2 (slot 4) are considered to be dual-channel RAM slots.

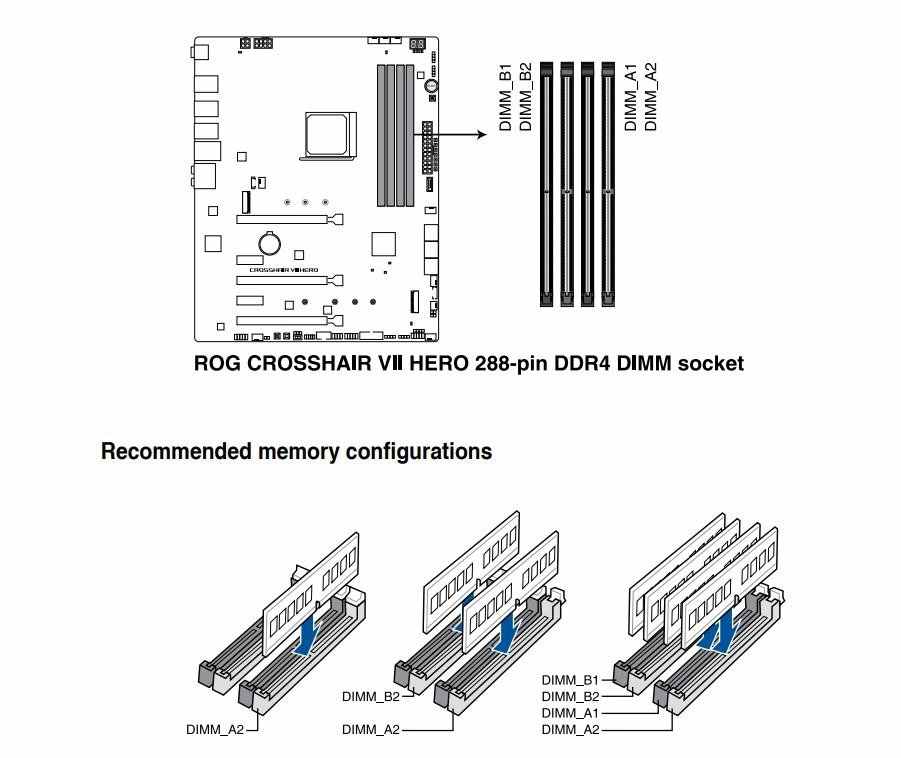
image credit: ASUS
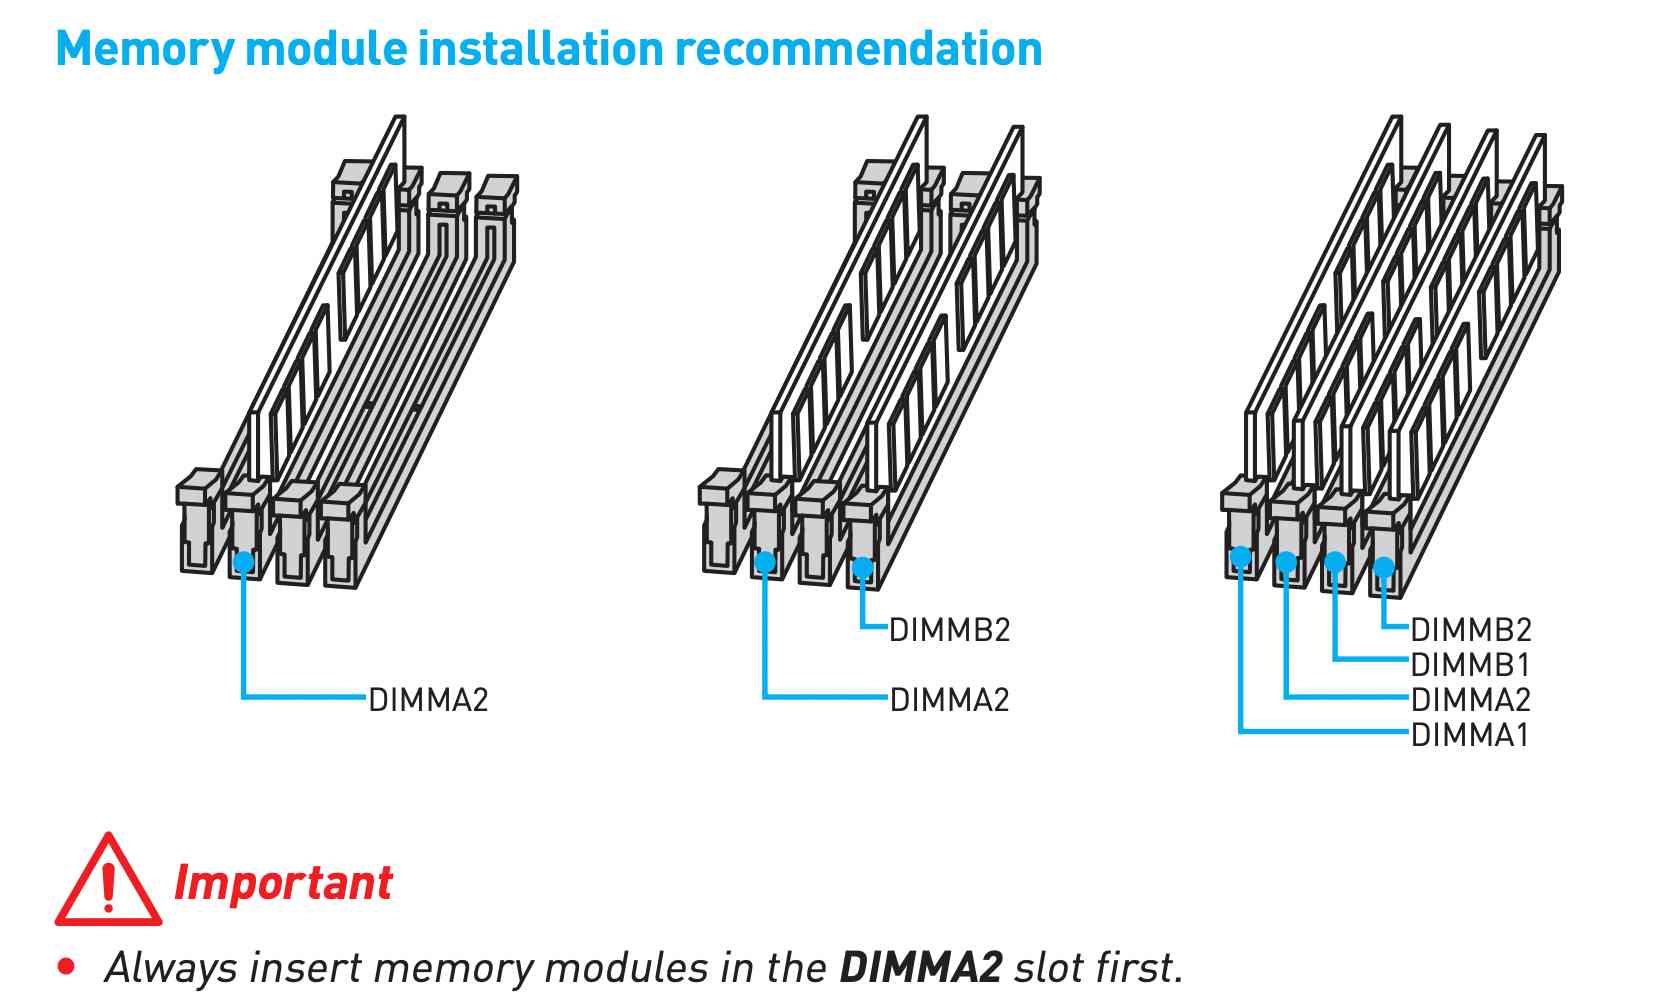
Unless your motherboard has only one RAM slot available, it is usually advised to install the single RAM stick in the DIMMA2 slot first, so you should always check with your motherboard manual to find the exact spot.
Different motherboards have different slot orders so it is crucial that you consult with the manual. If you don't have it, try looking for the slot that is marked on the motherboard as DIMMA2 or DDR4_2.

image credit: MSI
Determining where to put your RAM sticks will depend on the number of sticks you have and the number of slots your motherboard has.
For example, if you’re a gamer, you’ll need 16 GB of RAM for a smooth gaming experience. For the dual-channel memory that most motherboards support today, it’s better to use two 8 GB RAM sticks.
You should remember that reading your motherboard manual will help you the most because the RAM slot order can be different for every motherboard.
However, there are general rules you can follow:
Most motherboards have up to four slots, but some double that number. If you have a motherboard with eight slots, your computer might support triple-channel or quad-channel memory support.
Similar RAM installation order applies here as with four-slot motherboards.
In case you have an uneven number of RAM modules, you’ll have to mix and match RAM for configuration. It could cause issues, and multi-channel configurations might not work properly.
If by any chance, your motherboard supports a triple-channel memory, then everything should be fine. However, if your motherboard supports dual-channel (or more) memory, you won’t benefit from it with an odd number of RAM sticks. It’s possible for the motherboard to force all RAM sticks to run in single-channel mode.
However, modern CPUs can go into the so-called flex mode, a feature where a four-slot motherboard with three RAM sticks will run two of the three in dual-channel mode and one RAM stick in a single channel. Therefore, you probably won’t have any issues running an odd number of sticks.

image credit: youtube.com/@Techquickie
One way to increase your RAM speed in order to boost your computer’s performance is to buy new RAM modules and replace your old ones.
Having established what slots RAM should be in, let's see the steps on how to install them on your PC.
Your computer may not act as expected initially, so you’ll need to restart it. It takes a bit of time for your motherboard to get used to the newly installed memory. But don’t worry, everything should work fine in just a few minutes.
A laptop motherboard, as opposed to a PC motherboard, has the sticks lying flat, not vertically. Additionally, some laptops have SO-DIMM memory sticks meaning they are soldered directly onto the motherboard. You’ll probably need assistance removing them.
Although your laptop may lag due to low RAM, some laptops can’t handle more. Therefore, you should check these things before applying new RAM sticks:
If your laptop is eligible for a RAM upgrade, you should follow these steps:
Remember that when installing memory modules to your motherboard, you should be careful not to overclock your RAM. It might be the reason your computer crashes and freezes.
If you are wondering what slots to put RAM in when upgrading your desktop or laptop, it’s best to consult your motherboard manual first. However, most modern motherboards allow two RAM modules of the same speed and generation to run in dual-channel. Therefore, you’ll need to put them in corresponding sockets in pairs 1 & 3 or 2 & 4.
Your email address will not be published.
Updated · Feb 11, 2024
Updated · Feb 11, 2024
Updated · Feb 08, 2024
Updated · Feb 05, 2024


