


Wiki Guide: How to Extract Data from Wikipedia Using an API?
![Muninder Adavelli]()

Muninder Adavelli
Updated · Feb 11, 2024
Updated · Sep 15, 2023
Aditya is an Azure DevOps and Infrastructure Virtualization Architect with experience in automation,... | See full bio
April is a proficient content writer with a knack for research and communication. With a keen eye fo... | See full bio
This page may contain links to our partners’ products and services, which allows us to keep our website sustainable. Тechjury.net may receive a compensation when you sign up and / or purchase a product or a service using our links. As an Amazon Associate we earn commissions from qualified purchases. This comes at no extra cost to you. On the contrary, these partnerships often allow us to give you discounts and lower prices. However, all opinions expressed on our site are solely ours, and this content is in no way provided or influenced by any of our partners.
If you're experiencing internet problems on your Windows 10 or 11, there's a strong chance it's due to a corrupted DNS cache. Flushing the DNS cache can quickly fix this issue and get your computer back online.
Clearing your DNS cache helps enhance your privacy, fix HTTP errors, and prevent potentially harmful DNS spoofing.
Check out the ultimate guide below to learn how to flush DNS cache in Windows 10 and 11 and fix your connection problems quickly.
|
🔑 Key Takeaways:
|
DNS, known as the Domain Name System, is like the internet's phonebook. Its job is to translate domain names into IP addresses so web browsers can load the online content. The DNS cache keeps these translations to speed up later access to the same sites.
In Windows 10 or 11, you may encounter various issues related to the local Domain Name System (DNS) cache.
These issues include:
This guide shows you how to fix it by clearing the DNS cache or resetting it.
|
✅ Pro Tip: If you're curious about your device's DNS server and its owner, check its DNS through the What is My DNS Server website for free. |
Maximize web performance using the following approaches to flush DNS cache:
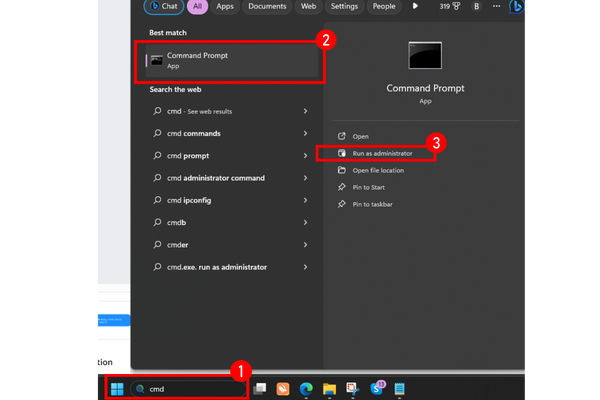
The Command Prompt is the go-to way to clear DNS in Windows, and it's popular for good reasons. The "flush dns" command is simple, quick, and easy to recall. To do this, follow these steps:

|
✅ Pro Tip: If you're having trouble accessing websites due to IP address problems, your server could be the culprit. Flushing or changing DNS might help, but upgrading your VPN could fix IP problems faster. |
The PowerShell (or Terminal in newer versions) is another tool you can use to flush dns win10 and win11. This method is compatible with various command-line utilities, including Windows Terminal, Windows PowerShell, and the older Command Line (cmd) utility.
If you've got to clear the DNS cache on Windows 10/11, follow these steps:
|
⚠️ Warning: While PowerShell is a powerful tool, it should be used with caution. Incorrect commands can cause system instability. |
There's an even simpler way to clear the DNS cache — you don't need to deal with Windows PowerShell or Command Prompt. You can do it right from the Run dialog box. Just follow the steps below:
 Source: Canva.com

|
👍 Helpful Article: To better grasp DNS concepts and address a DNS leak issue, check out Techjury’s guide. It explains DNS leaks, their origins, and how to avert them. |
Sometimes, clearing the DNS cache on your browser can also help resolve browsing issues. DNS cache isn't only stored by your OS like Windows; your web browser might also hold onto DNS records.
Luckily, you can clear the cache on your browser as well. Just open your chosen browser and follow the steps below.
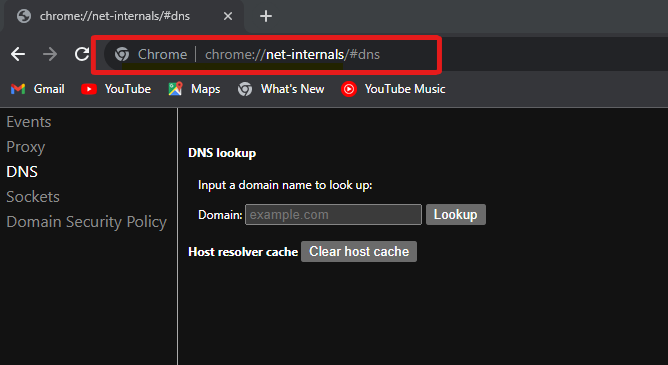
Some Windows apps and browsers, like Google Chrome, come with DNS caches. These caches are separate from the ones your OS handles.
So, apart from clearing the DNS cache for your OS, you should also clear Chrome's DNS cache. Follow the steps below to do it:

|
👍 Helpful Article: If your system error persists despite flushing your DNS cache, explore Techjury’s guide for more insights |
In 2020, Microsoft Edge made a change to improve itself by moving to Chromium. This boosted its stability and performance.
The steps to clear its DNS cache are similar to Chrome because it now shares the same browser engine. Just repeat the following:

|
🎉 Fun Fact: Microsoft Edge is said to be a more efficient browser than Chrome, using less RAM and providing better battery life. |
Flushing your DNS cache has numerous benefits, including:
The clearing process is remarkably simple. Following the outlined steps, you can swiftly perform a DNS flush on any operating system. This lets you quickly resume your website development tasks and help improve your internet browsing experience.
Start by flushing your DNS cache, but if the problem continues, consider altering your DNS server or verifying your internet connection.
To refresh DNS, clear your DNS cache using various methods like the 'Run' command, Command Prompt, or PowerShell on Windows 10 and 11.
Bad DNS can be caused by various issues, including outdated DNS cache, incorrect DNS settings, or problems with your internet service provider (ISP).
Yes, it is safe to flush DNS. It does not affect your internet speed or performance but can help resolve browsing issues.
SHARE:
Your email address will not be published.
Updated · Feb 11, 2024
Updated · Feb 11, 2024
Updated · Feb 08, 2024
Updated · Feb 05, 2024