
Wiki Guide: How to Extract Data from Wikipedia Using an API?
![Muninder Adavelli]()

Muninder Adavelli
Updated · Feb 11, 2024
Updated · Sep 11, 2023
Deyan is an avid enthusiast and self-proclaimed fan of the Windows operating system. His passion for... | See full bio
Florence is a dedicated wordsmith on a mission to make technology-related topics easy-to-understand.... | See full bio
This page may contain links to our partners’ products and services, which allows us to keep our website sustainable. Тechjury.net may receive a compensation when you sign up and / or purchase a product or a service using our links. As an Amazon Associate we earn commissions from qualified purchases. This comes at no extra cost to you. On the contrary, these partnerships often allow us to give you discounts and lower prices. However, all opinions expressed on our site are solely ours, and this content is in no way provided or influenced by any of our partners.
In October 2022, Twitch pulled out Host Mode from the platform, leaving a few unique options to support the favorite streamers of 140 million monthly active participants. One of these options is Raid.
Raiding sends all viewers to another channel while live streaming on the platform. Viewers get transferred to a targeted channel, contributing to someone else’s viewership. By doing this, streamers can potentially contribute to the growth of other streamers.
Start your streaming journey by incorporating Twitch Raid and witness its benefits firsthand. This article will tell you everything you need to know.
|
🔑 Key Takeaways:
|
When you raid a streamer, your viewers will be sent to your raiding channel. This allows your viewers to join the chat of the raided channel, watch their content, and interact with the new streamer and their community.
Accompanied by on-screen animations and sound effects, the raided streamer receives a notification of the influx of new viewers.

You may find it easy to mix Twitch Raid with Twitch Hosting, but the two features differ. While both features assist streamers in connecting and nurturing relationships, they have distinct characteristics that set them apart.
Examine the differences between these two features in the following section.
Raiding and hosting aim to foster community building within the Twitch platform. They both facilitate viewer interaction and engagement by encouraging viewers to discover and connect with other streamers.
One of the key distinctions between Twitch raiding and hosting lies in interaction. In a nutshell, raiding creates an immediate and direct interaction, while hosting is more indirect, as viewers remain on the host’s channel.
Look at this image below for a detailed comparison:

Now that you know the difference between Twitch raiding and hosting, it’s time to delve into Twitch Raid’s benefits and how to start one.
Raiding allows the raided channel to display its content to a larger group of people. While also promoting a positive environment among streamers and viewers through interactions, conversations, and reactions during the stream.
|
✅ Helpful Article: You can capture all these fun interactions using Twitch’s “clip” feature. Check out this guide to learn how to clip on Twitch to capture your favorite streaming moments. |
The following are other benefits that you’ll get when you use Twitch Raid:
Understanding Twitch raids can transform your streaming journey and create a lasting impact. Read on to find out the steps to raid a channel.
When you raid another streamer’s channel, you introduce your viewers to new and exciting content. It’s also a way to keep them engaged and entertained even after your stream ends.
Here are the steps to properly raid a channel:
Clearly communicate to your viewers that you intend to raid another streamer. Do not ambush them.
Provide a brief introduction of the streamer you intend to raid so your audience knows what to expect. Notifying your audience allows them to have the option to participate, and it also creates anticipation.
Once you’re done informing your audience, you’re ready to initiate the raid.
|
📝Note: For the raid to take effect, your Twitch channel should be live, as well as the target channel. |
Twitch offers two options to facilitate seamless raiding. Once you do either, you can click the purple 'Raid Now' button to send everyone from your channel to another channel.
Let’s dig into each of them below:
Using the chat command is the easiest way to begin a raid, but you need to know the channel’s name beforehand. Planning and checking out a few channels before going live is recommended.
To proceed, follow the steps below:
1. On My Chat, type ‘/raid’ and enter the channel name you want to raid. For example: /raid TechJury
![/raid [channel] on the chat box](https://trinity-core.s3.us-west-1.amazonaws.com/techjury/assets/64feb4f0bcb32.png)
2. Once you hit Enter, a pop-up with a 10-second countdown will be displayed.

3. After 10 seconds, click on Raid Now.

If no 10-second window prompt pops up, it could be that the streamer you’re about to raid has permissions that don’t allow raids.
|
💡 Did You Know? You can stand out in the chatbox on Twitch by changing the color of your username. If you’re a paid subscriber, you can change the Twitch chat color with over 16 million colors to choose from. |
Another way to start a raid is through the Quick Actions menu. This alternative is better employed if you haven’t decided who to raid yet, as this will allow you to browse through some options registered in your suggested channels list.
Here’s how:
1. On your Twitch Dashboard, click on your user profile icon, then select Creator Dashboard.

2. Under the Creator Dashboard, click Stream Manager.
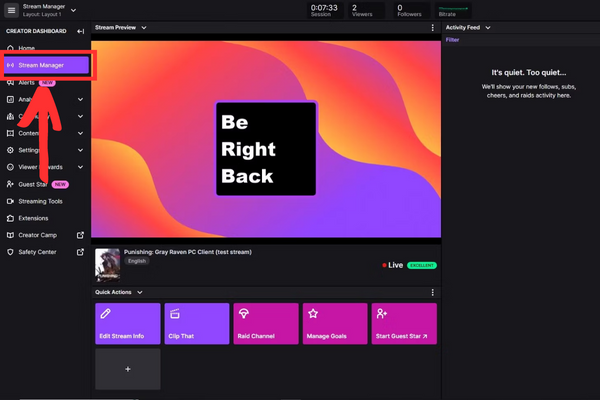
3. Click Raid Channel.

4. Browse the channels list and select the channel you want to raid.
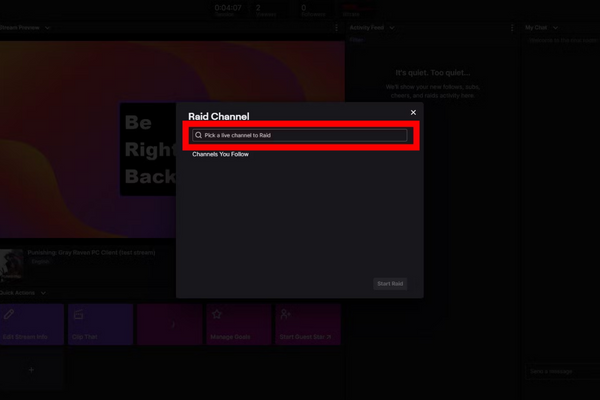
5. Finally, click the Start Raid button.

Now that you’ve learned how to use the raid feature on Twitch. It’s time to learn how to moderate incoming raids to avoid malicious attacks from other channels.
|
🎉Fun Fact: Twitch has another feature that enables users to create private chat rooms called Whisper. Find out more by learning how to whisper on Twitch. |
Although raids are meant to be a collaborative experience, it remains crucial for streamers to manage their channel. Thankfully, some tools can help broadcasters handle incoming raids effectively.
Check these tools you can use to manage and moderate raids:
The Raid settings provide a range of choices regarding who has permission to initiate a raid on your channel. Here’s how to modify the Incoming Raid Settings:
1. Under the Creator Dashboard panel, click Settings.

2. Check Stream.
In particular, you can personalize the following:


Additionally, the raiding channel must still adhere to the viewer and account age requirement that you’ve established.

|
✅Pro Tip: If you want to allow all raids without restrictions, set your minimum viewer count to one. Leave the maximum count field blank and set the account age to zero. Most importantly, do not tick the checkboxes of the optional groups. |
Twitch offers an option to block all incoming raids for an hour temporarily. Any changes you apply will take effect immediately, even if you’re currently live.
Follow the steps below to deny incoming raids temporarily:
1. Go to your Stream Manager.
2. Click the ‘+’ button.
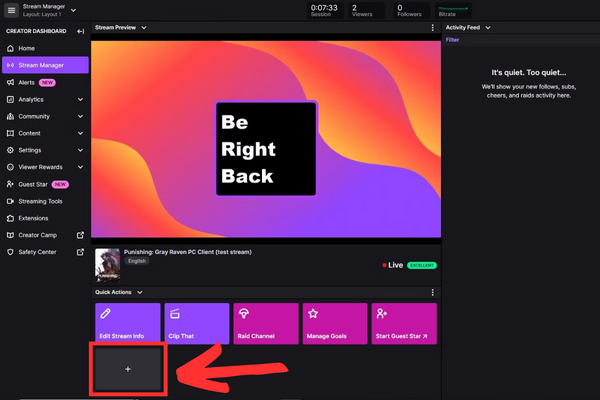
3. Look for the Stop Raids for 1 Hour button.

4. Click Add.

Easily activate this quick action at any point during your stream to disable all incoming raids. If you want to allow raids again, you have two options:
5. Wait for the timer to expire.
6. Click the quick action button again to re-enable raids.
You can effectively manage spam from incoming raids through Chat Settings. If necessary, you can even shut down the raid completely.
The following channel modes can help you customize your chat:

|
✅ Pro Tip: Enhance your Twitch experience with the Better Twitch TV (BTTV) browser extension, which offers access to countless new emotes and extra chat features. Learn where to find BTTV emotes and how to use them. |
While raiding can be a positive and supportive action, streamers sometimes must report or implement a chat ban on raiding channels for several reasons. This can be due to the following:
If you need to report or ban a Twitch raid, you need to do this:
1. Click on Chat Settings on your chat window.
2. Under the Tasks section, click Review Recent Raids.

3. Then click Report or Ban.
It’s important to balance positive interaction and maintaining control over your chat space.
Harassment in Twitch chat is a significant issue that can negatively impact streamers and viewers. It can take various forms and target streamers, viewers, and other participants.
To avoid this, learn how to manage chat messages using AutoMod, a tool designed to prevent inappropriate ones.
Here are the steps to take:
1. Go to Creator Dashboard and click the hamburger icon.
2. Click Preferences.
3. Then click Moderation.
4 Look for the AutoMod Controls section and click AutoMod Rulesets.
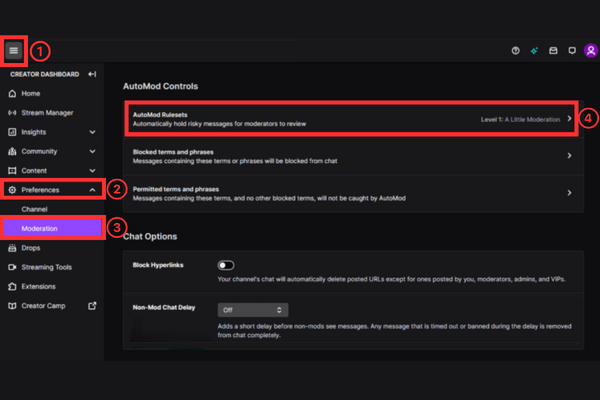
5. Locate and click the ‘Turn on AutoMod’ option, and adjust the slider bar to the level that best suits your preferences. Then click Save.

The levels range from Level 0 (no filtering) to Level 4 (the most rigid setting). You also have the option to make your custom settings using the drop-down menus and update each moderation category individually.
|
✅ Helpful Articles: Aside from annoying trolls, another inconvenience to users’ viewing experience is the ads. Fortunately, there are six different ways to block Twitch ads. As an alternative, Prime Gaming includes a complimentary subscription to a Twitch channel, which might interest you. |
With its ability to foster connections and expand communities, Twitch Raid offers a valuable tool for established and emerging content creators.
Ensure to adhere to proper etiquette when raiding to maximize its potential. Moreover, utilize the tools available to manage and moderate incoming raids to maintain a controlled streaming environment.
You’re now equipped with the knowledge and tools needed to conduct your first Twitch raid confidently. Go ahead and seize the opportunity to create meaningful connections.
No. Once you raid a channel, your stream is not over, but it’s important to note that raids are best used at the end of your broadcast since they involve sending your viewers to another channel.
If you get raided, be sure to thank the streamer and raiders for joining. Briefly introduce yourself to the new viewers and talk about what your channel is about.
Yes. You can start raids as a streamer or editor and join raids as a viewer on mobile devices.
There is no exact number for the maximum number of viewers allowed for a Twitch Raid. However, there was an instance when Shroud, a popular Twitch streamer, attempted to raid a smaller streamer with 89,000 viewers, but Twitch stopped it and prompted that he had ‘too many viewers.’
SHARE:
Your email address will not be published.
Updated · Feb 11, 2024
Updated · Feb 11, 2024
Updated · Feb 08, 2024
Updated · Feb 05, 2024